Sinikka's snippets

Finland and travelling, a woman's life, cultures, languages, photography plus family recipes


2 Comments

Homemade ice-cream

Finns are crazy for ice-cream. Their consumption of this frozen delight has been number one in Europe for some time, and fourth in the world, with only New Zealand, Australia and the US beating us. According to statistics, an average Finn devours as much as 14 litres of ice-cream a year – an awful lot! I don’t really know the reasons for this. It can’t be hot weather for sure – otherwise we’d hardly ever get a chance!

With our particular craving for ice-cream, it’s no wonder that the supermarkets have long, long aisles of different options on offer, one more delicious and decadent than the other. And come the first signs of summer, the little ice-cream kiosks appear at every street corner, so we can rush for instant gratification everywhere.

My first outdoor ice-cream in June this summer

With this scenario, why on earth would you make the effort to prepare your own ice-cream at home? I had never given it a second thought before as I believed it’s far too time-consuming and complicated, requiring expensive, special equipment. Yet, this summer I came across the simplest recipe – with, can you believe it, only 2 ingredients for the base! And no ice-cream machines needed! Make the base, and add whatever you like – fantastic! You can use all your imagination in designing the flavour combination exactly to your liking. What’s more, as an extra bonus you will avoid a lot of the E-numbers and other additives of regular ice-creams.

INGREDIENTS

  • 1 can of condensed milk
  • 0,33 l carton of whipping cream

THIS IS WHAT YOU DO

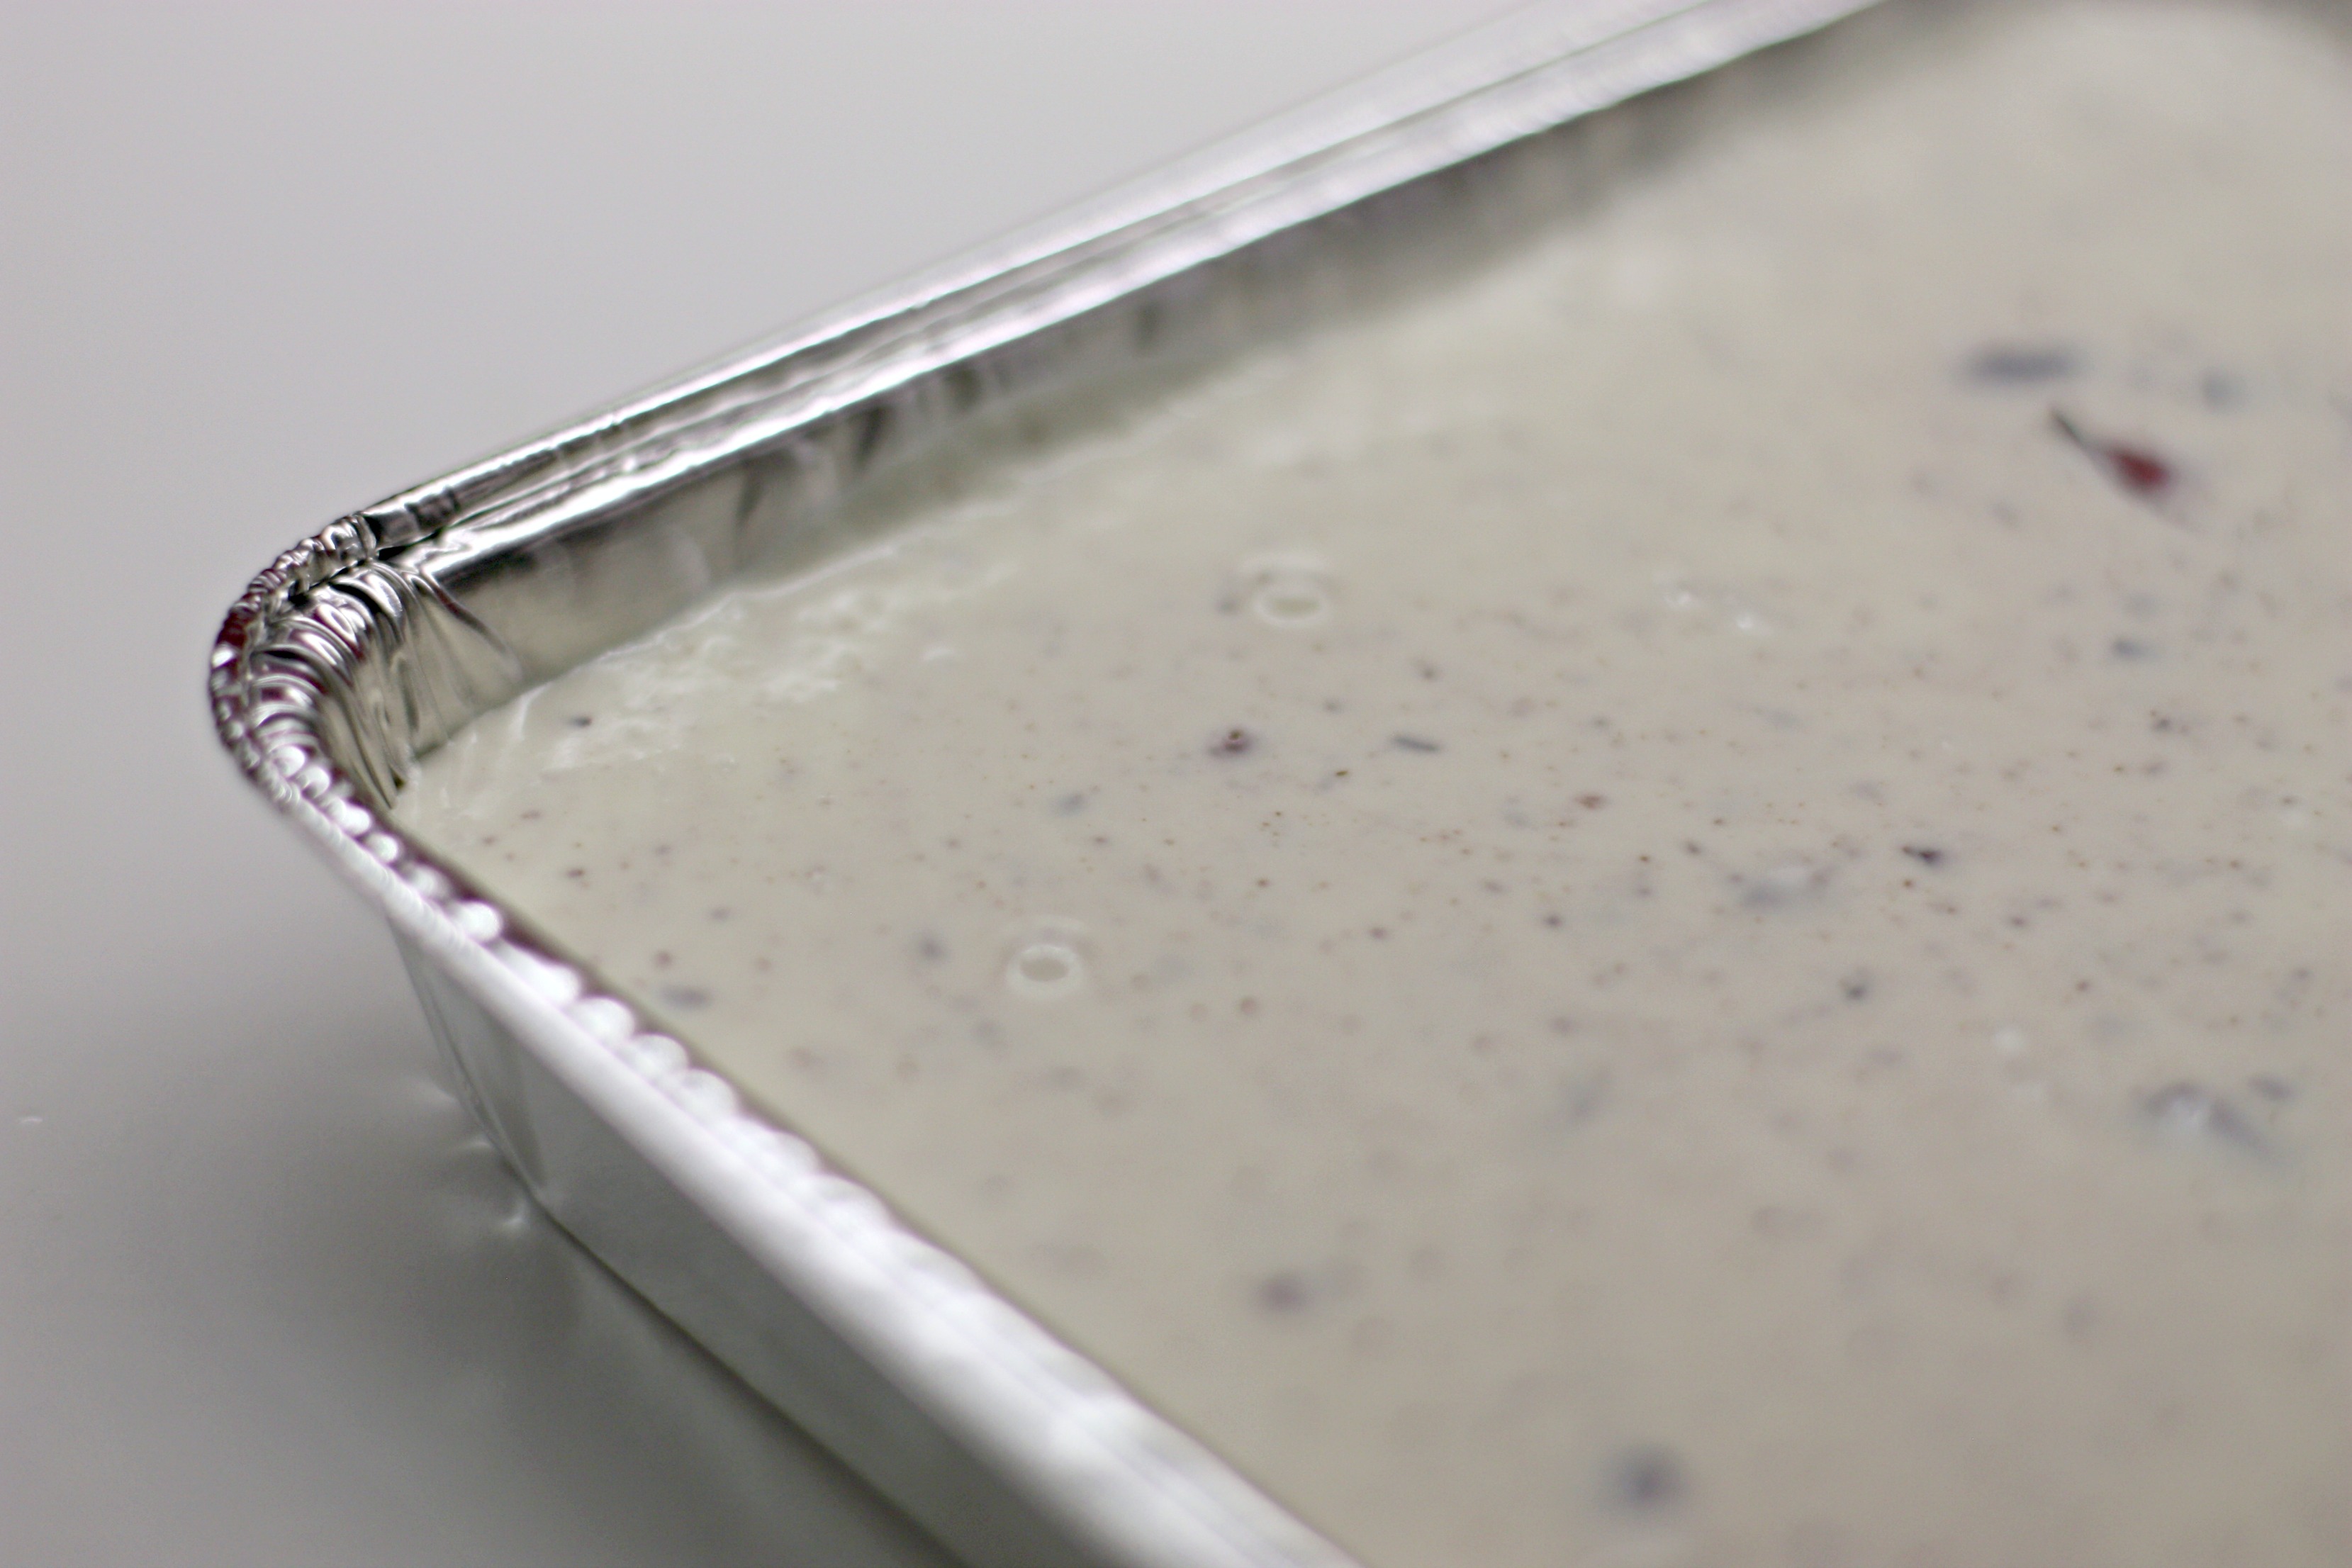
  • with an electric mixer, beat the milk and cream for some minutes until it begins to thicken
  • then shift in whatever flavourings you like
  • pour the mixture into a freezer-proof container
  • cover with cling film and freeze for around 4-5 hours

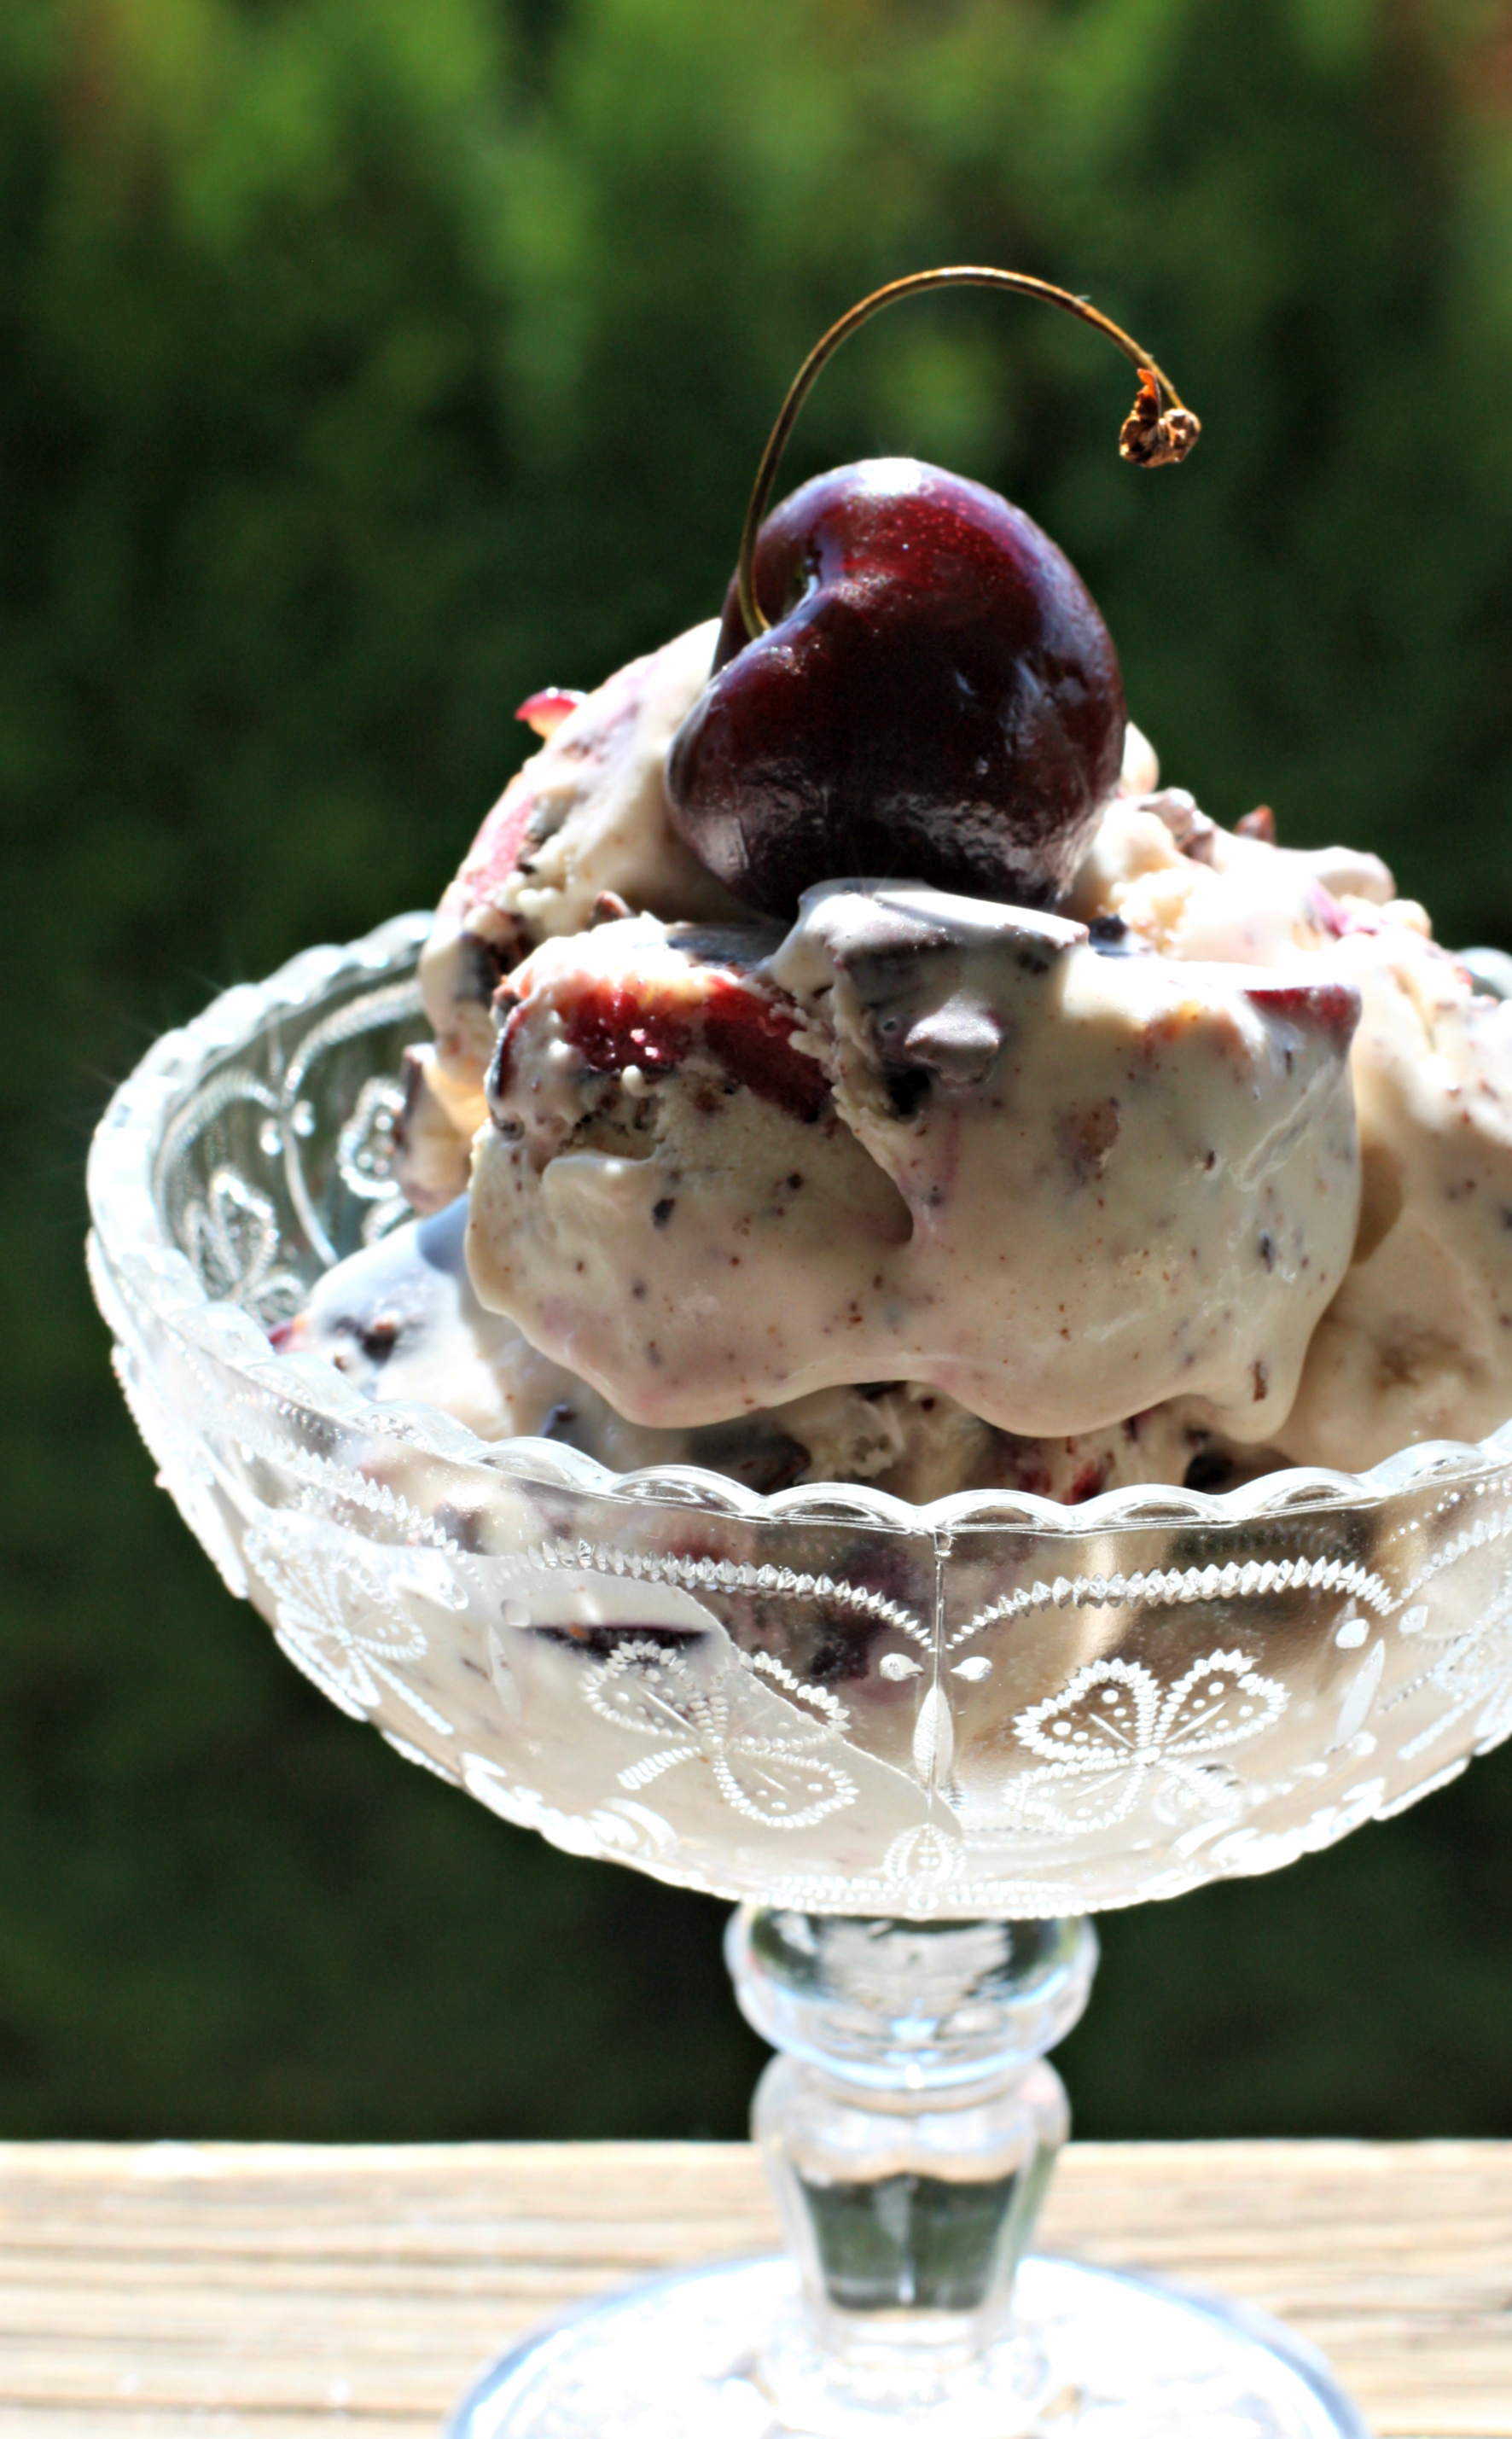
For my first attempt, I made a batch for hubby with some of his favourite tastes – chopped cherries and dark chocolate, with a spoonful of bourbon whisky.

The result was truly yummy – hubby approved, too! I’m sure I’ll make some more in the future, as a novelty dessert for dinner guests. It does sound like you are a true kitchen goddess if you announce that dessert will be home-made ice-cream, doesn’t it?

Advertisement


2 Comments

My banana bread – comfort food at its best

Here in Finland we are not very accustomed to any type of British-style ‘tea bread’. If we want something to enjoy with coffee or tea, it’s usually an open sandwich, or the traditional ‘pulla’ if you fancy something sweet. Yet, living in a Finnish-British family, I soon got to know all the nice British goodies for tea time.

I once found this recipe in an old English home baking book, and have gradually developed it for my liking. Even though it’s baked in a loaf tin, and called ‘bread’, for me it’s still more like ‘cake’, due to its sweetness. When our daughter was small, this soon became our staple for the many long road trips we went on around Europe. I usually baked at least two, wrapped them in foil, and that would be our breakfast and snack during the trip. It keeps well, thanks to the moisture from the bananas, and is nourishing and comforting.

INGREDIENTS

  • 120 g butter
  • 120 g caster sugar
  • 2 eggs
  • 120 g plain flour
  • 1 tsp bicarbonate soda
  • 1/4 tsp salt
  • 1 tsp ground cinnamon
  • 55 g wholewheat flour
  • 3 large ripe bananas (I always buy fair trade or organic)
  • 1 tsp vanilla essence (or vanilla sugar)
  • 55 g chopped walnuts (I chop mine rough as I like a crunchy consistency)

THIS IS WHAT YOU DO

  • with an electric mixer, cream the butter and sugar until light and fluffy
  • add the eggs, one at a time
  • mix together the plain flour, soda, salt and cinnamon, and add to the mixture
  • stir in the wholewheat flour
  • with a fork, mash the bananas to a purée and stir into the mixture
  • add the vanilla and nuts
  • pour the mixture into a loaf tin, lined with greaseproof paper and bake in 180° C for 50-60 minutes

Mmmmm – I wish I had a ‘scratch and smell’ facility in this blog!

Cut nice and thick slices, and enjoy – on its own, with tea or coffee or any way you like! Delicious warm straight out of the oven but just as nice as a cold snack on the road.

I was reminded of this old favourite during my recent two-week adventure in Australia, as I found banana bread in the breakfast menu of almost every café I visited there. They usually served it toasted, with some butter on top. That was new to me, as we always used to devour our slices plain. So thank you Australia for giving me a new breakfast idea!

Good morning Aussie style, even with the fresh melons and pineapple plus the souvenir aboriginal-themed tea towel! (The dishes are very Finnish, though.)


9 Comments

Apple and lingonberry crumble

img_6082

I love autumn, with its beautiful, warm colours. It’s also the delicious season of domestic apples and lovely, slightly sour, superfood lingonberries from the Finnish woods. We don’t have apple trees of our own but luckily, family and friends usually offer us goodies from their gardens. Or you can always find them in the farmers’ market or supermarkets. We are not especially keen berry pickers either but in the last few years have spent a weekend at our friends’ cottage picking some lingonberries.

picmonkey-collage-2

This crumble has been our family’s autumn favourite dessert for almost three decades. I used to have piles of all sorts of women’s mag recipe cuttings, collected by my mum during her lifetime. Among them, I once spotted a recipe for an oat flake crumble, made with tinned peaches. I remember trying it once in my flat during uni years, but found it far too sweet for my liking. The crumble part was nice and crunchy, though. Later on, I thought it might work with apples. But no, even that was a bit on the sweet side. Finally, as apples and lingonberries are in the same season and as I’ve always loved lingonberries, I thought of combining the two. And there it was: my own autumn crumble recipe! It’s been devoured and enjoyed by both family and friends for hundreds of times over the year – and we never get tired of it. Worth trying!

INGREDIENTS

  • seasonal apples, any variety (I usually use about 10 but this depends on the size of your dish)
  • 3-4 dl fresh lingonberries
  • sugar and cinnamon to taste
  • 8 dl oat flakes
  • 2 dl sugar (caster or brown)
  • 200 g melted butter or margarine

picmonkey-collage

THIS IS WHAT YOU DO

  • peel and core the apples and cut them into small wedges
  • mix with the lingonberries on the bottom of your oven dish
  • sprinkle with a little bit of sugar and plenty of cinnamon
  • for the crumble, simply mix the oat flakes, sugar and melted butter
  • cover the apples and berries with the crumble
  • bake in c. 175° C for c. 1 h 15 mins (cover with foil if the top starts getting too dark)

img_1493

The baked lingonberries give this dessert a wonderful, juicy consistency that goes well with the drier crumble topping. This desserts is best enjoyed warm with with either vanilla ice-cream or cold custard. It works both as a simply, everyday family treat, or a fancier dessert for visiting dinner guests.

dessert2 img_1570

YOU WILL POSSIBLY WANT A SECOND HELPING!


4 Comments

Cherry jam with Amaretto

IMG_7446

Here, by popular demand, is my cherry jam recipe, extremely simple to make. What makes it so simple, is the Finnish ‘jam sugar’, which has natural pectin in it, to get the right consistency, plus added calium sorbate, to help the jam keep longer. I don’t know if a similar sugar – a jelly sugar or something similar maybe – is available in other countries.

Last year, I used cherries from our own trees, which are very bitter and quite unsuitable for eating on their their own, but they worked well with this recipe. And a year on, the jam is still as delicious as ever! Just had some for breakfast this morning.

INGREDIENTS

  • 1 kg pitted cherries
  • 1/2 dl of cherry juice (water boiled with the removed pits)
  • 500 g jam/jelly sugar
  • 1/2 dl Amaretto (almond) liqueur

IMG_7475

THIS IS WHAT YOU DO

  • pit the cherries (you will need about 2 kg of unpitted cherries)
  • put the removed pits into a saucepan with c. 2-3 dl of water and cook for 5-10 minutes, then sieve the juice
  • put the cherries and 1/2 dl of the juice into a saucepan, and bring to a boil
  • add the sugar and let it boil at medium heat for around 15 minutes, peeling off any foam that forms on the surface
  • add the liqueur (if you a child-friendly version, add the liqueur with the sugar, to make sure that all the alcohol evaporates)
  • pour the jam into clean, warmed up jars and close them carefully
  • store the cooled down jars in a cold place

breakfastjam jamcloseup

YUMMY ON BREAD OR TOAST FOR BREAKFAST!


4 Comments

New potato salad

P1110830

New potatoes are a big thing in Finland. It’s usually around the end of May that the first ones from Sweden arrive in the supermarkets. You’ll have to wait till June for the Finnish ones. After eating old ones, which tend to get more and more tasteless and floury in consistency plus ugly with all sorts of blemishes and dark spots, all through the winter, the first small, fresh, new ones look and taste out of this world. The best place to get them is, of course, the market place where you often find local farmers selling their produce. Mind you, you can also get very decent new potatoes in most supermarkets.

Don't you just love the old-fashioned measuring tins at Finnish market places?

Don’t you just love the old-fashioned measuring tins at Finnish market places?

The simple way is the best to enjoy these delights. Just boil them, and then savour them with some fresh dill and a knob of butter. In terms of food, there is not much that can beat that in summer! It’s curious with the Finnish tradition to use dill. My late English mother-in-law found it very strange at first, as over there mint is the go-to herb with potatoes, but she got to like it in the end. And I, in turn, learned to appreciate potatoes with mint.

8936678223_a73d68511a_o

A forkful of summer goodness!

Whenever I prepare new potatoes, I always get a double amount at least, as they will soon be eaten as cold snacks during the day. Hot or cold, they are good with anything – other summer vegetables, fish, grilled meat, in soup, you name it!

Here is a family favourite summer recipe of a mustardy new potato salad that I prepare several times every summer, to accompany grilled sausages, for example. The most common potato salad with grilled food is one with small cubes of potatoes, with gherkins and onions and a thick mayonnaise dressing. This recipe brings you some change to the ordinary summer fare.

IMG_0963

INGREDIENTS

  • c. 1 kg boiled new potatoes (quite small, round ones work best)
  • 2-3 tbsp mustard seeds
  • 2 tbsp strong mustard (or more if you like the taste)
  • 4 tbsp freshly squeezed lemon juice
  • 1 tsp salt
  • 2 tsp sugar
  • some freshly ground black pepper
  • 1 dl oil (I usually use milder rapeseed oil for this, but I’m sure olive goes as well)
  • fresh chives
  • rucola (plus optional iceberg lettuce)

IMG_0961

THIS IS WHAT YOU DO

  • Prepare the potatoes. (I am usually very picky with potato peels but, for some reason, this salad doesn’t taste right if you peel the potatoes. Just carefully brush and wash them before boiling.)
  • While the potatoes boil, prepare the dressing.
  • Toast the mustard seeds on a clean, dry frying pan. Let them cool down.
  • In a bowl, mix the toasted mustard seeds, mustard, lemon juice, salt, sugar and black pepper.
  • Gradually stir in the oil to get an even consistency.
  • Halve the still warm potatoes into the dressing and mix them together. (The warm potatoes nicely soak in some of the dressing and spices.)
  • Serve layers of rucola and potatoes on a plate, or in a bowl. (Sometimes I prefer more greenery, and put leaves of iceberg lettuce on the bottom.)
  • Cut lots of chives on top.
  • If there are any left-overs, keep in the fridge, and it will taste just as good the next day!

IMG_0966

ENJOY WITH YOUR CHOICE OF GRILLED TREATS!


4 Comments

Mum’s summer soup

I just love going to our market place (or any farmers’ market) in summer. It’s beautifully colourful with all the fresh, local vegetables, berries, flowers and other goodies. One of my favourite summer morning activities is to cycle there, have a little breakfast at one of the outdoor kiosks there, and then do my shopping. Just got to remember to have plenty of cash as most of the stalls (often run by individual farmers) don’t accept any plastic cards!

4699777497_82a057bf50_o

One of our family’s recent favourite summer dishes is a traditional Finnish “summer soup”. Funny enough, I used to hate it as a child, and so did our daughter, as it took both of us quite some time to get the taste of any cooked vegetables. We only ate cold, raw vegetables as children! In fact, once going through some old photographs, I noticed that in very many of them our daughter had a raw carrot in her hands! It was only later that I decided to prepare this soup that used to be one of my mum’s summer favourites. And since then, we’ve got to love its mild, summery taste, too.

The secret is in choosing all fresh ingredients and prepare it from scratch. No tinned peas or ready-cut frozen bags of vegetables for this one! Carrots will be “Bugs Bunny”-style with their green stalks on, and the peas will be individually shelled. Preparing the vegetables takes some time but I find it really relaxing, especially as you get to eat some of them raw while doing it.

4700407294_c3dba42a69_o

INGREDIENTS (for 4 portions)

  • about 400-500 g of small NEW potatoes
  • 1 fresh cauliflower (c. 400 g)
  • 1 fresh onion
  • 3-4 carrots
  • about 3 dl of fresh peas
  • a handful of fresh spinach leaves
  • 1 l vegetable stock
  • 4 dl milk
  • 2 tbsp regular wheat flour
  • 1 knob of butter
  • pinch of salt if needed
  • herbs (eg. parsley or dill)

kasviscollage

THIS IS WHAT YOU DO

  • Peel and slice the carrots, chop the cauliflower into small florets, peel the potatoes and cut them in half, chop the onion (you can also use some of the stalk). I always prefer to use the very small round new potatoes for this soup. Although normally, I would just brush them before boiling, leaving some of the goodness of the peels on, for a soup I prefer peeling them.
  • Cook the vegetables in the vegetable stock for about 15 minutes.
  • Add the peas and the rinsed spinach leaves.
  • Mix the flour and the milk and add into the soup. Cook until all the vegetables are done (not too soft, though, as you’d want a nice mouthfeel!).
  • Add the herbs of your choice. I seem to always go for dill as that’s our traditional herb with new potatoes here in Finland.
  • To finish with, add the knob of butter, which really rounds up the taste nicely.

keittocollage

Enjoy the summer soup with a cheese sandwich. Here in Finland, it would, of course, be dark, rye bread and some emmental or gouda-style cheese.

leivankaa parempilautanen

A BOWLFUL OF SUMMER!


2 Comments

Butterscotch cake – men’s favourite

The way to a man’s heart is through his stomach.

Or so they say. I can’t exactly say that the way to my man’s stomach was this cake, but I do remember that quite a few of his male friends used to praise this cake whenever they had a piece at my place, telling my then boyfriend (now husband) that I was a keeper.

I cut the recipe from a women’s magazine decades ago because it sounded good. Since then it has been “my signature cake”. Whenever there is a special occasion, I usually bake one. Especially if it’s to do with hubby’s special celebrations. The combination of hazelnuts and dark chocolate in the cake mixture is simply heavenly with the soft butterscotch topping. It’s actually so yummy and morish that hubby often hides some, to have more for himself before others eat it all up.

Hubby celebrated a special birthday just last weekend

Hubby celebrated a special birthday just last weekend

INGREDIENTS

  • 3 eggs
  • 2 1/2 dl sugar
  • 150 g butter
  • 3 dl ordinary wheat flour (not self-raising)
  • 1 tsp baking powder
  • 75 g hazelnuts
  • 75 g dark chocolate

IMG_8435

THIS IS WHAT YOU DO

  • Beat the eggs and sugar until fluffy.
  • In a separate bowl beat the butter until light.
  • Combine the two mixtures.
  • Crush the hazelnuts (or buy a packet of ready-made crush) and chop the chocolate into small pieces
  • Mix together the flour, baking powder, nuts and chocolate. Add to the mix.
  • Grease a low, preferably a springform, round cake tin. Pour in the mixture.
  • Bake at low temperature, 150° Celsius, for about 40-50 minutes.

IMG_8455

FOR THE TOPPING

  • 2 dl full whipping cream
  • 2 dl sugar
  • 1 tbsp butter
  • chocolate sprinkles

Now this is the tricky part of this cake. Getting the butterscotch just right takes some practise and experience. I have failed in so many ways over the year. Either I cooked it too little, which results in a too liquid consistency that is immediately soaked in by the cake, and results in no topping at all. Or, trying to avoid the previous scenario, I cooked it too long, and ended getting it thick, grainy and horribly hard. I’ve also managed to produce a sticky, chewy consistence that almost breaks your teeth, just as the worst type of toffee! Anything is possible unless you know exactly what temperature to use on your cooker, and what the correct consistency is. Don’t lose heart, though – you may be a natural with this, or then, at least through trial and error you will get it right.

IMG_0386

Put the cream and the sugar in a saucepan and start cooking at medium heat. On my present induction cooker, I tend to have the temperature at 3.5-4 (out of 9). Keep cooking, stirring it quite often, so it won’t stick to the bottom. Make sure it’s bubbling a little all the time, but not too much! Just small bubbles like in the picture above. For me, the cooking time tends to be a minimum of 30 minutes, sometimes even more. Towards the end, the mixture starts thickening up and darkens in colour. A test that all the recipes advise is to put a drop of the mixture into a glass of cold water. If it dissolves at all into the water, it’s not ready yet. It’s supposed to form a nice, solid drop on the bottom of the glass. I usually always keep testing one drop after another, and never really know if it’s right or not. Nowadays, having baked this cake so many times, I just use my intuition (and still sometimes get it wrong!).

Anyway, once the butterscotch is ready (or you think it is), take the pan off the heat, add the butter, and let it settle for a while. Then pour it on top of the cake that you have removed from the baking tin. Start from the middle and keep moving towards the sides. The butterscotch is supposed to trickle down the sides of the cakes. You can help it with a knife if needed.

IMG_0391

Decorate with some chocolate sprinkles, and voilà, ready to be devoured!

IMG_0401 IMG_0406

To serve the cake, a bunch of green grapes look nice, and go very well with the taste as well. The cake keeps quite well for several days, and stays nice and moist. If kept in the fridge, the butterscotch tends to lose its shine a little.

IMG_0416 IMG_0427

ENJOY ON ITS OWN, OR WITH A CUP OF GOOD COFFEE!

IMG_0419


4 Comments

Finnish pancake

IMG_0519

First off, I need to explain that here in Finland ‘pancake‘ (Finnish ‘pannukakku‘ – literally a direct translation of the English word) is prepared as one big square on a baking tray in the oven. This is then cut into small square pieces for serving. The mixture is the same as for ‘crèpes’ that are round, thin and fried individually on a frying pan. We do make crèpes, too, but sometimes it’s easier and quicker to just prepare the whole lot in one go in the oven. This sometimes gets confusing with English speakers who have a very different concept of what ‘a pancake’ should look like. My British husband, for example, would say the Finnish pancake is more like their Yorkshire pudding although, of course, we would not eat our pancake with main course meat. As for the American pancakes, I would rather call them ‘thick crèpes’ – crazy Finns, right? It makes sense, though, when you know that the Finnish words for ‘crèpes’ (‘letut‘, ‘lätyt‘, ‘ohukkaat‘) all somehow refer to their thinness above all.

Both the pancake and crèpes are common summer cottage fare over here. Finnish cottages tend to be rather basic and rustic, often without a lot of mod cons. That’s why, we Finns usually want to keep cooking there as simple as possible. An oven pancake or crèpes are ideal as they require very few ingredients. I’ve sometimes seen crèpes fried on a pan on a small camping gas bottle at a cottage.

A pancake is nice and homely comfort food that everybody usually enjoys, children especially. It is usually served as a dessert after a soup, for example. In fact, the Finnish conscript army has given us the tradition of having pea soup and pancake on the menu on Thursdays (I really don’t know why that weekend was chosen!). This tradition is often followed for in school canteens during the school year. In our family, a pancake used to be an evening snack when our daughter was small. And if there are any leftovers, they taste just as good cold for breakfast the next morning!

We prefer our pancake with strawberry jam but it works just as well with fresh berries, and even added whipped cream if you like. I must say that I much prefer the fancier toppings for crèpes, though. The American favorite, maple syrup, is not commonly used here in Finland. Instead, some Finns just like their piece of pancake with only a bit of sprinkled sugar on top.

IMG_0528

INGREDIENTS (for one baking tray, c. 20 pieces)

  • 4 eggs
  • 2 tbsp sugar
  • 1 tsp salt
  • 1 l milk
  • 5 1/2 – 6 dl ordinary wheat flour (not self-raising)
  • 1/2-1 dl melted butter

IMG_0520

THIS IS WHAT YOU DO

  • in a bowl, beat the eggs, sugar and salt
  • add the milk
  • add the flour little by little
  • to finish with, add the melted butter
  • let the mixture stand for 30 minutes
  • line the baking tray with a grease-proof baking sheet
  • pour the mixture on the tray
  • bake at 225° Celsius for 15 minutes first, then lower the temperature to 200-175° Celsius and bake for another 15 minutes, or until the top and bottom are beautifully brown
  • cut into pieces and enjoy with a topping of your choice

SIMPLY DELICIOUS!

12951124884_67be4b7944_o


Leave a comment

Easter dinner: Moroccan stew with couscous

Easter. The in-between time of winter and spring. Nature waking up from the long slumber, snow beginning to melt, hope of new life budding once more.

IMG_4480

My Easter dinners used to be a bit hit and miss for many years. I tried all sorts of things, from chicken to lamb. Lamb went out of the window that one and only time I painstakingly prepared it, only to find our then 8-year-old daughter crying her eyes out in the corner, refusing to come to the table. Amidst loud sobs, I finally got the explanation, in a tiny quivering voice: “It’s because of the little ss-hh-ee-ee-p…!” She always used to very sensitive to anything to do with particular animals, so that was the end of Easter lamb in our family. I didn’t mind as lamb has never been my favourite either!

I finally came up with our family Easter recipe back in 2007. I took our daughter to Paris for a few days during the winter holiday in February. One evening we had dinner at a Moroccan restaurant, somewhere on the “Rive Gauche”. Despite a few cockroaches squirrying on the walls, we really enjoyed the food – a rich, spicy meat and vegetable stew, served with couscous. Now, here’s a picture down memory lane, from that particular night at the Parisian restaurant (my word, how young and vulnerable she looks!).

paris 022a

Back home, I looked for recipes online, and with years of tweaking, this is my concoction. We even pinched the starter salad idea from the same restaurant: juice orange slices on a bed of lettuce, sprinkled with cinnamon – deliciously appetising!

INGREDIENTS (serves 3 – 4)

  • oil
  • 1 large onion
  • 450 g of diced beef (alternatively lamb)
  • 2 dl soaked chickpeas
  • salt and black pepper to taste
  • 3.5 – 5 dl vegetable stock
  • 3 carrots
  • 1 gourgette (zucchini)
  • 3 potatoes
  • fresh parsley and coriander (cilantro)
  • couscous

TOMATO PASTE:

  • 4-5 tomatoes
  • 3-4 cloves of garlic
  • 2 tsp ground ginger
  • 2-3 tbsp fennel seeds
  • 1-2 tsp turmeric
  • sweet chilli sauce to taste

ingredientscollage

THIS IS WHAT YOU DO

  • remember to put the chickpeas to soak in cold water the night before!
  • prepare the tomato paste by mixing all the ingredients in a food processor until smooth
  • if you are not keen on garlic, put less
  • I use a fair helping of the chilli sauce but even a couple of tsp will do if you don’t like it spicy
  • chop the onion
  • heat the oil in a large saucepan and fry the onion until nice and soft
  • add the diced meat, and fry lightly
  • add the tomato paste, soaked chickpeas and 3.5 dl of vegetable stock
  • season with salt and black pepper to taste
  • reduce the heat, and simmer for about 1 hour till the meat is nice and tender
  • add the carrots, gourgette and potatoes, all cut into bite-size chunks (not too small!)
  • cook for a further 30 minutes till the vegetables are done – keep adding vegetable stock if the stew seems too dry
  • when done, cut plenty of green parsley and coriander on top
  • prepare couscous while the vegetables are cooking

readystewcollage P1110377a

We usually enjoy this meal with some red wine although I actually find that water goes better with the chilliness and spiciness. Mind you, the taste is still rather mild, and you can easily adjust it to agree with your taste buds by reducing or increasing the amount of spices. Any leftovers can be warmed up the next day, and the flavours usually mature nicely overnight. I usually prepare a double portion, which will be enough for two days as Easter Monday is also a holiday here in Finland.

Easter is also the time of yellow daffodils, both in your home and outside.

IMG_9025IMG_8876

WELCOME SPRING AND HAPPY EASTER!


2 Comments

Finnish bun variation 1: Shrove Tuesday

IMG_8255a

February is still a fully winter month in Finland. Minus temperature, especially at night, and usually quite a bit of snow, too. But, the darkest period is gradually passing, and there are glimpses of hope, with longer and longer daylight hours, and bright sunny days. Shrove Tuesday brings a nice, happy change to the winter drudgery. It is celebrated annually in February, with wintry outdoor activities, such as sledging, skating or skiing.

sledging

What’s more, there are, of course, special foods and treats associated with this day. Lunch or dinner may consist of pea soup with pancake for dessert, for example. However, an absolute must, after doing some sport out in the cold, is to warm yourself up with a hot drink and a special “Shrove Tuesday bun”.

IMG_8671

I can still remember my university days when my best girlfriends and I always used to skip afternoon lectures on this Tuesday, go skating and then to a certain café in town to treat ourselves to coffee and these buns. The café in questions used to be popular among elderly ladies, who would typically come early in the day, to avoid the crowds. Our girly giggles and chatter sometimes got on their nerves so much that we even got asked to leave once if we couldn’t keep the volume down. Oh, those were the days!

IMG_8643

Each bakery has their own Shrove Tuesday buns, all slightly different. But, being biased I guess, I just think that nothing beats the home-baked ones.  They are really easy to bake, too. All you need to add to my basic bun recipe, is almond paste (a bit softer and less sweet than marzipan) and whipped cream.

Bake the buns as usual. Let them cool down well. Then simply cut “the hat” off, make a hole in the middle (just eat the surplus piece of bun!) and fill it with the almond paste. Whip the cream, adding a little bit of sugar and vanilla, and put a good dollop on top of the almond filling. Then put “the hat” back on, and voilà. Heavenly with a cup of coffee, or a mug of steaming hot chocolate! IMG_8660 IMG_8662 IMG_8663

The only problem is how to eat the bun without making a total mess of whipped cream all over your face and clothes. Easy, just take “the hat” off and eat it first!

IMG_8667

Some people insist on replacing the almond paste with strawberry or raspberry jam. Bakeries, cafés and supermarkets usually sell both varieties. Personally, I prefer the almond paste, but each to their own. For comparison, underneath is a picture of  the more uniform, shop-bought jam-filled buns.

4314811702_175c0f56eb_o